
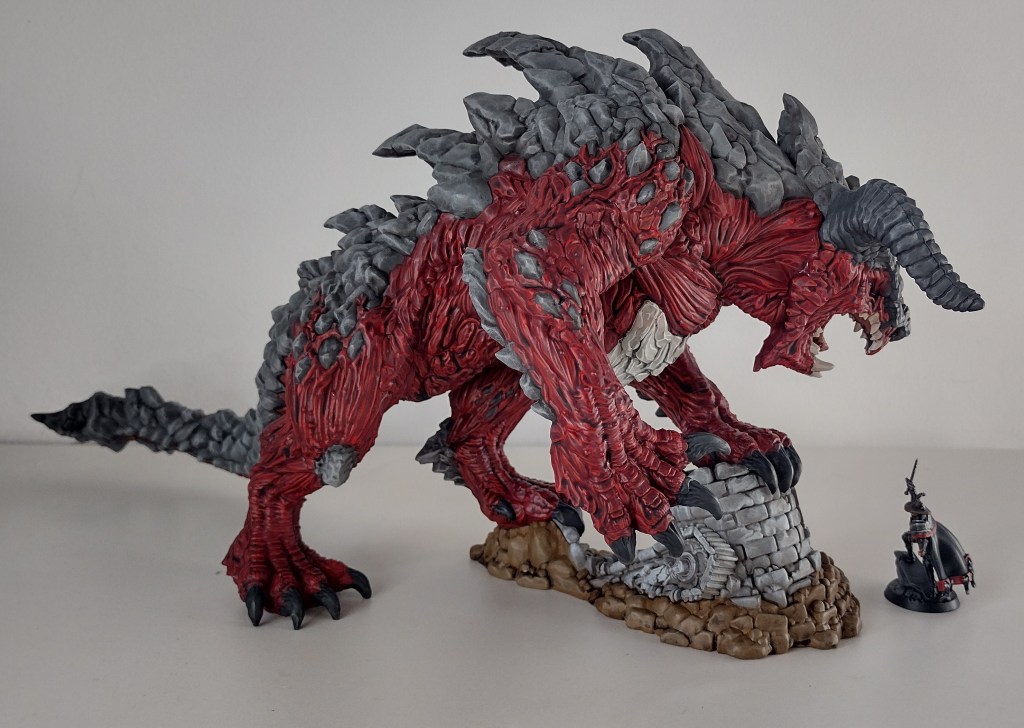
My pledge of Dungeons and Lasers: Encounters recently arrived, and with it, the greatest stretch goal I’ve ever seen: the mighty tarrasque. While the value and quality of the whole pledge was impressive, this was one of the main reasons I pledged. Granted, it’s a touch bigger than I expected, as in it’s absolutely huge (slightly smaller than my cat). Check out the D&D miniature used for scale in one of the below photos.
All that said, it’s been surprisingly quick and easy to paint. For the most part, it’s just a simple prime, base, wash, drybrush process.


Priming
Since a lot of this is grey, I went with a grey primer. I’d heard good things about Colour Forge primers so tried their Standard Grey out here. As a first impression, it seems about as good as the Games Workshop primers I’ve used but they’re a bit cheaper and I can reliably get an appropriate green to prime my Dark Angels.
The Back
I pictured the tarrasque as an apocalypse-level beast, something that literally tears itself out of the ground, having been mistaken for a mountain these last few centuries, and ready to smash the face of whoever has been trashing its planet. That in mind, I wanted a rocky texture, which lends itself to a good drybrush. I tried a few shades and eventually settled on a 50/50 mix of Vallejo German Grey and Vallejo Dark Sea Grey. I imagine there’s a colour in the range which covers this, but that’s what I had to hand. Once covered, I washed the lot with GW Agrax Earthshade, then drybrushed with Vallejo Dark Sea Grey. To pick out the sharpest edges, I lightly drybrushed with GW Ulthuan Grey.
Mine is quite simple. It would be great to see some of these with more weathering, different types of rock, perhaps lichen, mud, vegetation, or other effects on it.
The Flesh
Based on the lines and textures of the flesh, I felt something smoother than the drybrush was needed so I went with edge highlighting. There are lots of raised areas and lines like muscle fibres which are easy to follow with a brush. The red scheme gives a bit of an Attack on Titan feel, which is not something I’d usually go for but seemed to work well against the rocky back. I used a Vallejo Gory Red base, washed all over with GW Druchi Violet, then edge highlighted with GW Evil Sunz Scarlet.
Browns would also work well as an alternative, so it’s closer the the artwork in the D&D Monster Manual.
Chest and Underneath the Tail
I felt a colour more like bone might work for the chest, as though it’s grown into natural armour. I base coated with Vallejo Deck Tan before washing all over with watered down GW Nuln Oil. Even thinned, the wash was slightly too dark so I gave it a light drybrush of Vallejo Deck Tan to make it more subtle. After that, an edge highlight with Vallejo Ivory made it pop.
The Base
I kept the base simple. The tower is a base of Vallejo Dark Sea Grey, washed with GW Agrax Earthshade, then drybrushed back up with Vallejo Dark Sea Grey. A final drybrush of GW Ulthuan Grey picked out the edges to give it that white stone look. I decided the area around the tower was churned up earth, though it could just as easily be painted as fallen stones from the tower, or a combination of both. This was another simple matter of base coating with Vallejo Earth, washing with GW Agrax Earthshade, and drybrushing back up with Vallejo Earth. A subtle drybrush with GW Ushabti Bone finished it off.
Want to support the blog? You can pick up my fantasy short read, Mysticarium, for your Kindle, or buy yourself some gaming goodies from Element Games and I’ll get a little kickback.
